
Containerization with Docker allows you develop servers and applications faster and more securely. Building images for containers allows you to bundle code, configuration files, libraries and dependencies required for it to run. Docker benefits include:
- Portability between different platforms and clouds
- Efficiency by using fewer resource than a VM
- Large library of images available
- Reuse — easily extend an existing image
- Shared (standard) environments
This story shows you how to build the JupyterHub for Collaboration image if you want to extend it or if you want to build your own images. For a list of all JupyterHub collaboration stories see Data Science Team Collaboration with JupyterHub.
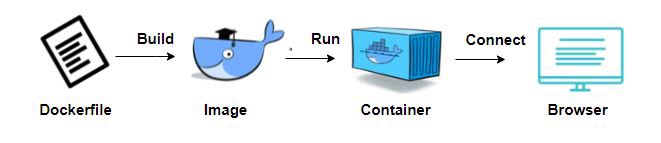
The build of a Docker image is driven by a Dockerfile. A container is a runnable instance of the image. You can connect a container to one or more networks.
The files used to build the JupyterHub for Collaboration image can be found on GitHub: JupyterHub-4-Collaboration. If you clone the repository the local Git folder has the following files:

The image is built using a Docker build command. The build uses a Dockerfile and a context (the local folder).
Dockerfile
A Dockerfile is a text document that contains all the commands that you could call on the command line to assemble an image. We will walk through the major commands in the file.
FROM continuumio/miniconda3:latest

RUN conda update -y conda
RUN conda install -c conda-forge jupyter_nbextensions_configurator \
    jupyterhub \
    nodejs \
    jupyterlab \
#   ipympl - Jupyterlab matplotlib widget
    ipympl \
    numpy \
    matplotlib \
    pandas \
    r-essentials \
#   rise - Reveal.js - Jupyter/IPython Slideshow Extension
    rise \
    scipy \
    sympy \
    seaborn
The FROM command builds our image on the existing Docker Hub image continuumio/miniconda3. The image packages Anaconda on a Debian UNIX server. Anaconda includes the most popular Python packages for data science and uses the Conda dependency and environment manager. We use the CONDA command to install JupyterHub, JupyterLab and important extensions and packages.
Next, we copy our JupyterHub configuration file and create-new-user script from the local folder to the container file system. See details on these files below.
COPY jupyterhub_config.py /
COPY create-new-user.py /
We then add the user admin to the container:
RUN useradd admin \
    && echo admin:default | chpasswd \
    && mkdir /home/admin \
    && chown admin:admin /home/admin \nn
JupyterHub Configuration File
The jupyterhub_config file is a script defining Hub configuration variables.
# jupyterhub_config.py
c = get_config()

# Change from Jupyter Notebook to JupyterLab
c.Spawner.default_url = '/lab'
c.Spawner.debug = True

# Administrators - set of users who can administer the Hub itself
c.Authenticator.admin_users = {'admin'}

# Set add user command to script supplied
c.LocalAuthenticator.create_system_users = True
c.LocalAuthenticator.add_user_cmd = ['python3','./create-new-user.py','USERNAME']
JupyterHub will spawn the single notebook server using JupyterLab instead of Jupyter Notebook. We define the admin user as the Hub administrator. And we define the create-new-user script as the process to run when new users are added.
create-new-user File
JupyterHub supports a number of user authentication methods. We are using the default PAM-based Authenticator, for logging in with container user accounts via a username and password. The create-new-user script will be run in the container when you select Add Users in the JupyterHub Hub Control Panel.
The PAM-based Authenticator is used to make it simple to test and evaluate the image. For production, an OAuth Authenticator would be a good choice. As we are using GitHub for file sharing your users will have GitHub accounts so you may want to use JuypterHub GitHub OAuth.
If you plan to use JupyterHub on a public network you should set up SSL encryption. For information on creating and defining SSL certificates see: Security settings — JupyterHub.
Build the Image and Container
Using a terminal or PowerShell you can now build the image. Set your context to the local Git folder and enter:
docker build -t jupyterhub4collaboration .to build an image called jupyterhub4collaboration. You can list the images using:
docker image lsor bring up Docker Desktop and select Images. To build a container called j4c and start the container:
docker run -p 8000:8000 -d --name j4c jupyterhub4collaborationYou can now connect to the container using http://localhost:8000.
Support for Multiple Environments
By using JupyterHub, your team will be using a “standard” environment. Support for a standard environment is important for reproducibility and collaboration. But you may need to support multiple environments as some projects may require a different set of packages.
Our image is built on Anaconda which provides the conda dependency and environment manager. Conda supports separate environments containing files, packages, and their dependencies that will not interact with other environments.
A conda environment is a directory that contains a specific collection of conda packages that you have installed. You can easily define environments through yaml files. The yaml file defines the information for environment you want to build such as:
- Name of environment
- Channels (locations of packages)
- Dependencies (packages to install)
For more detail on using conda with JupyterHub see: A quick guide to conda environments on JupyterHub.
Share Your Work
If you make changes or extensions to the image you can share it with others using Docker Hub. You will need to use your Docker Hub account name when building the image and container:
docker build -t account_name/image_name .
docker run -p 8000:8000 -d --name container_name / account_name/image_name
Then commit and push the image to Docker Hub:
docker commit container_name account_name/image_name
docker push account_name/image_name
For the complete list of stories on the JupyterHub for Collaboration image see: Data Science Team Collaboration with JupyterHub.
No responses yet